Sending IoT data real-time from the Azure Plug and Play Mobile App to a Blazor WebAssembly App with Azure IoT Hub Azure Functions and a SignalR Service
Saturday, July 22, 2023
Sending IoT data real-time from the Azure Plug and Play Mobile App to a Blazor WebAssembly App with Azure IoT Hub Azure Functions and a SignalR Service
#azure-functions #azure-iot-hub #azure-iot-plug-and-play-mobile-app #azure-signalr-service #azurite #blazor-webassembly-app #visual-studio
This article is published at GitHub.You can raise issues, create pull requests or even fork the content...its open source.
In this article, you will learn how to build a solution to send IoT data real-time from the Azure Plug and Play Mobile App to a Blazor WebAssembly App with Azure IoT Hub, Azure Functions and a SignalR Service.
Prerequisites
The following prerequisites will be required to complete this tutorial:
- Visual Studio 2022 Community with the ASP.NET and web development, and Azure development workloads. If you don't have Visual Studio installed, download Visual Studio for free before you begin.
- Azure account. If you don't have an Azure account, create one for free before you begin.
Create an Azure Functions Project in Visual Studio
Open Visual Studio.
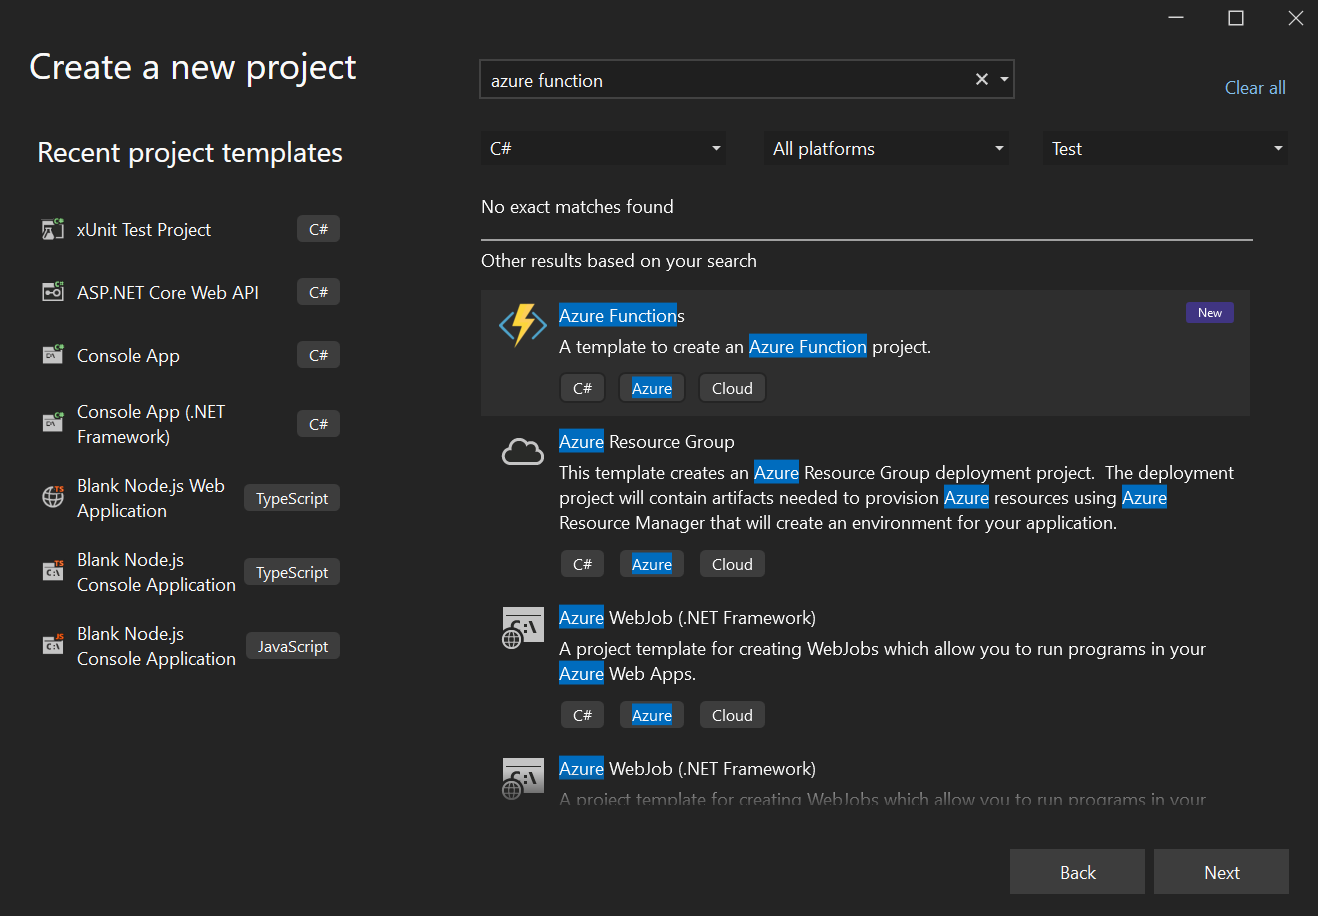
Select Create a new project.
Search for azure function. Select Azure Functions, and then select Next.
Enter the following values in the Configure your new project window, and then select Next.
Parameter Value Project Name IOTHubIngestionSignalR Location Location of your choice Solution name IOTHubIngestionSignalR Place solution and project in the same directory Unchecked 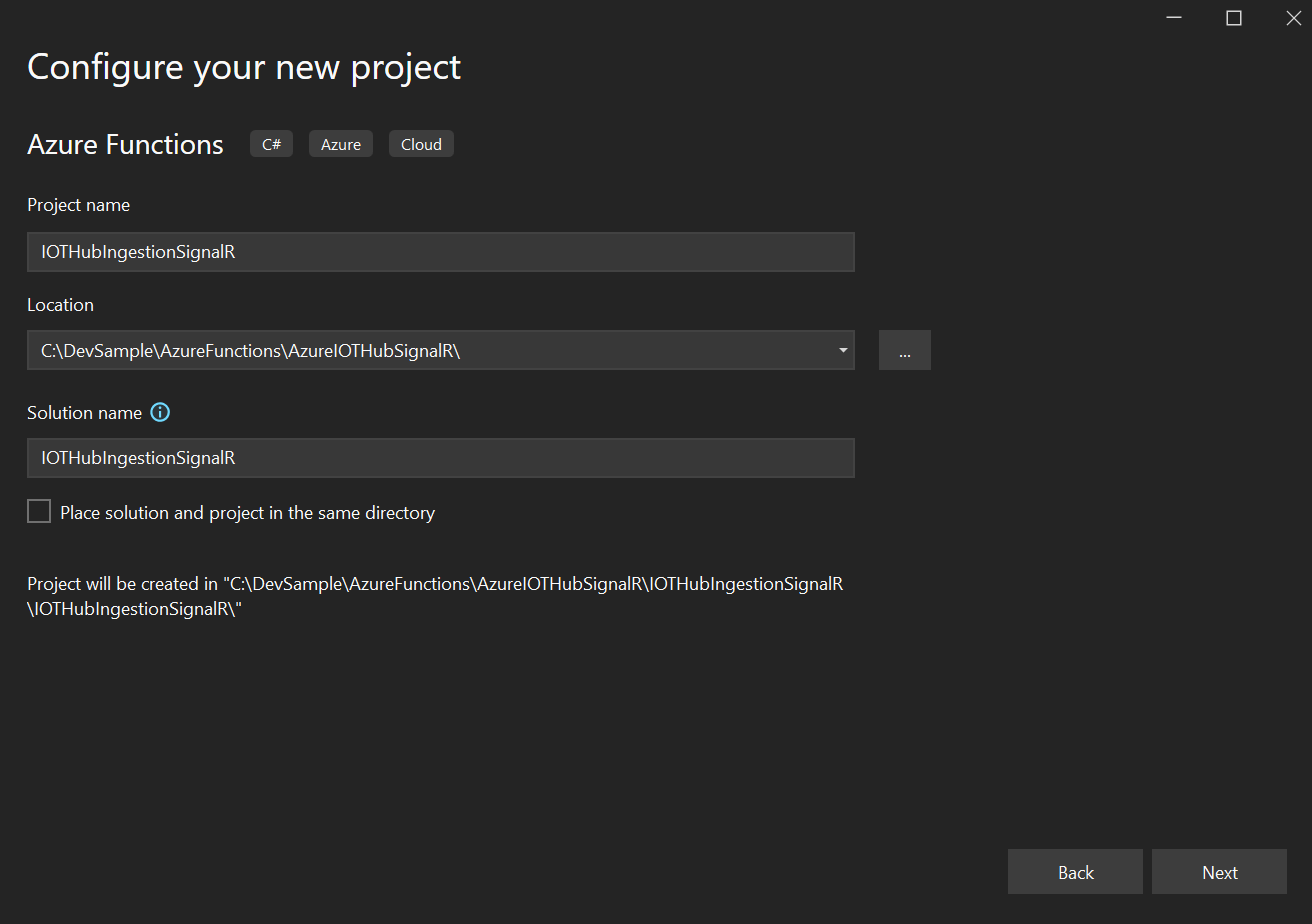
Enter the following values in Additional information, and then select Create.
Parameter Value Functions worker .NET 6.0 (Long-term support) Function IoT Hub trigger Use Azurite for runtime storage account (AzureWebJobsStorage) Checked Enable Docker Unchecked Connection string setting name IoTHubEndpoint Path messages/events 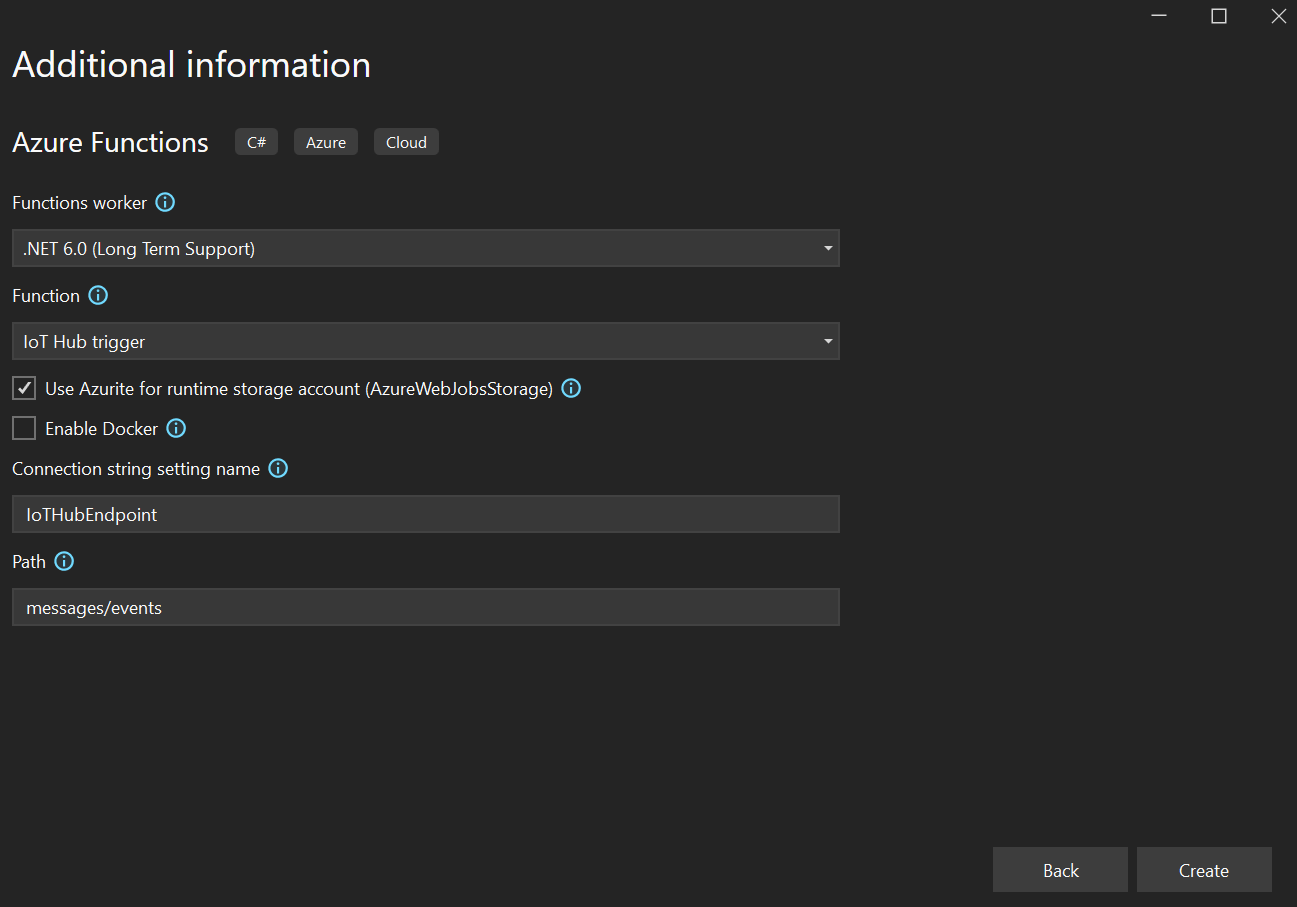
Create an Azure IoT Hub and Connect it to the Azure Functions Project
Create an Azure IoT Hub
Navigate to the Azure Portal, and then search for iot hub.
Select + Create.

Enter the following values in the Basics tab. Select Review + create, and select Create.
Parameter Value Subscription Your Azure Subscription Resource group Create new with a name of your choice IoT hub name Chosen name for the IoT hub name Region Location nearest to you that has the IoT Hub Tier Free Daily message limit 8000 (US$0/month) 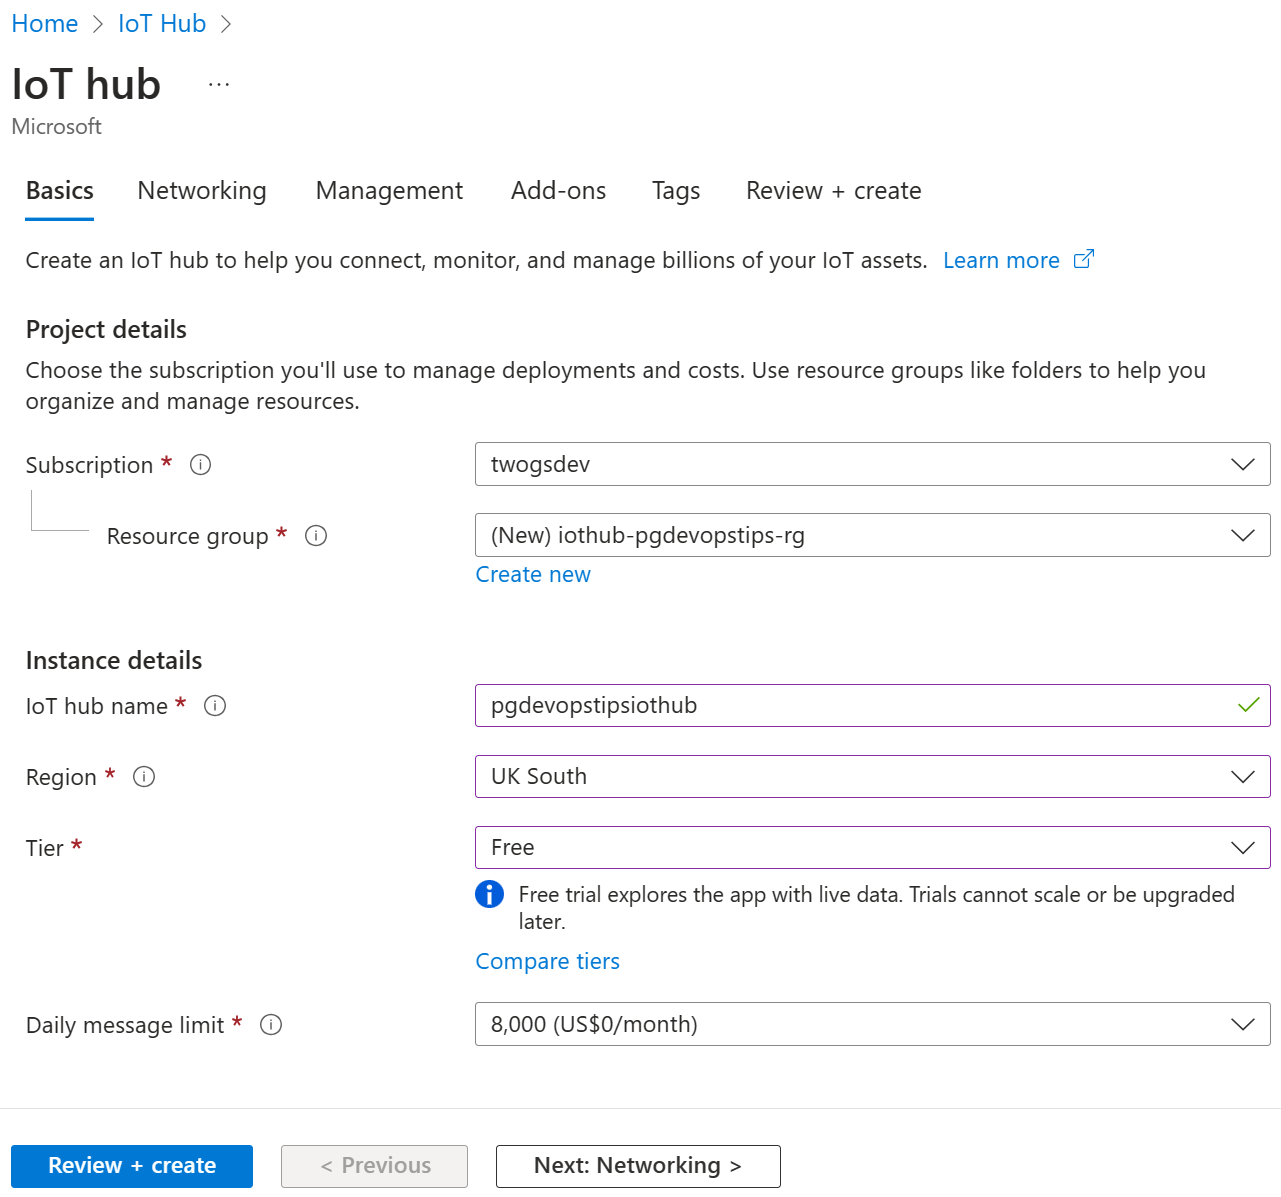
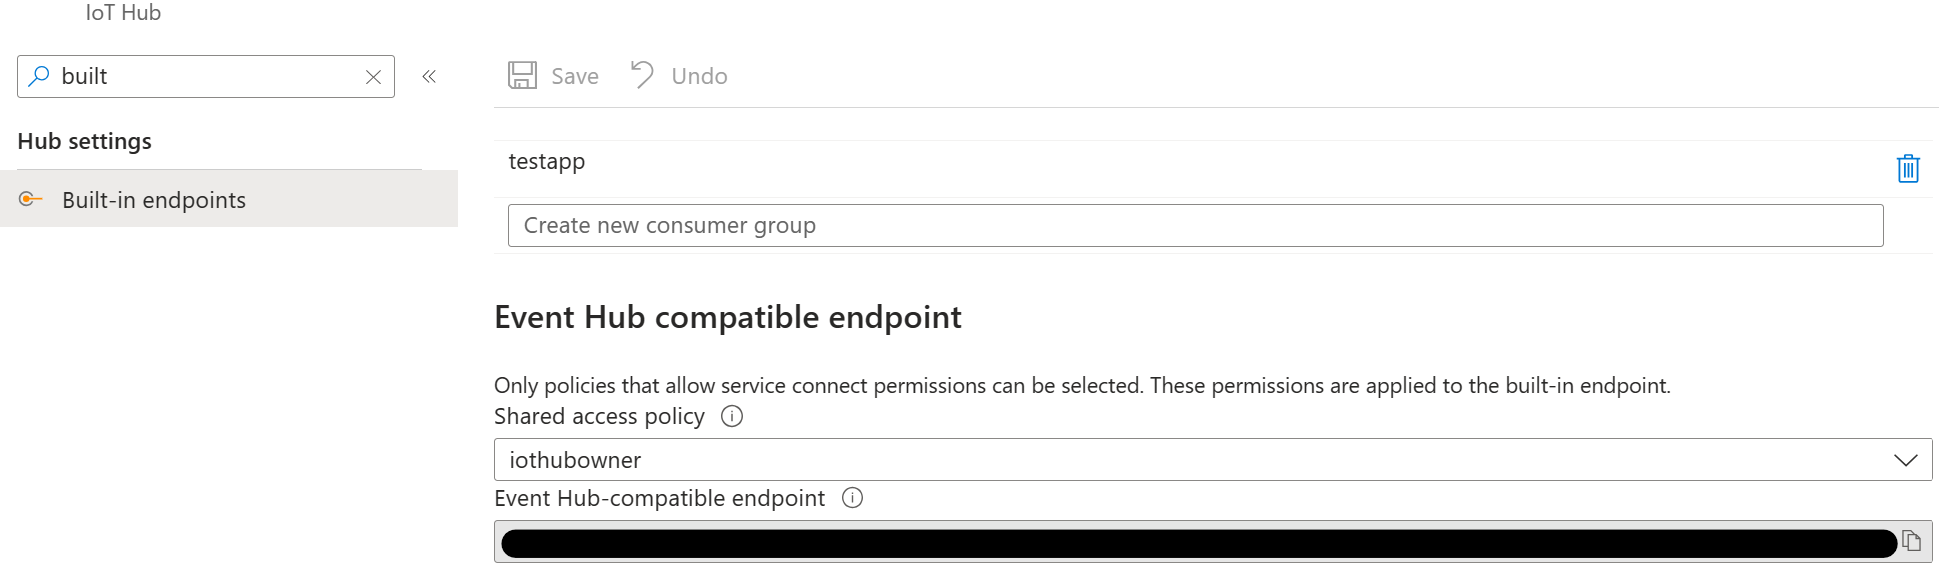
Navigate to your new IoT Hub and search for built. Select Built-in endpoints. Scroll down to the Event Hub compatible endpoint section, and copy the Event Hub-compatible endpoint value.
Update the IoT Hub Endpoint in the Azure Functions Project
In Visual Studio, open the
local.settingsjson file. Replace{YourIoTHubEndpoint}with the endpoint you copied earlier in the Azure Portal.{ "IsEncrypted": false, "Values": { ... "IoTHubEndpoint": "{YourIoTHubEndpoint}" } }
Update the Azure Functions Project NuGet Packages
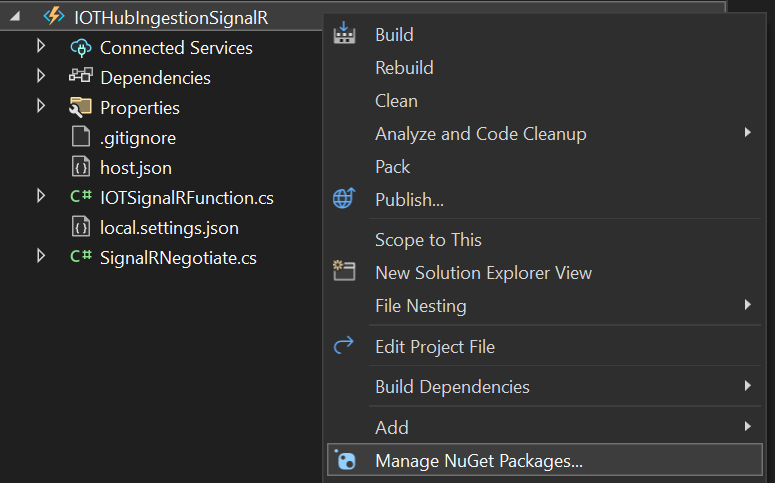
Right click on the IOTHubIngestionSignalR project, and then select Manage NuGet Packages....
Select Installed, and then select Microsoft.Azure.WebJobs.Extensions.EventHubs. Select version 4.3.0 in the Version drop down list and then Update.
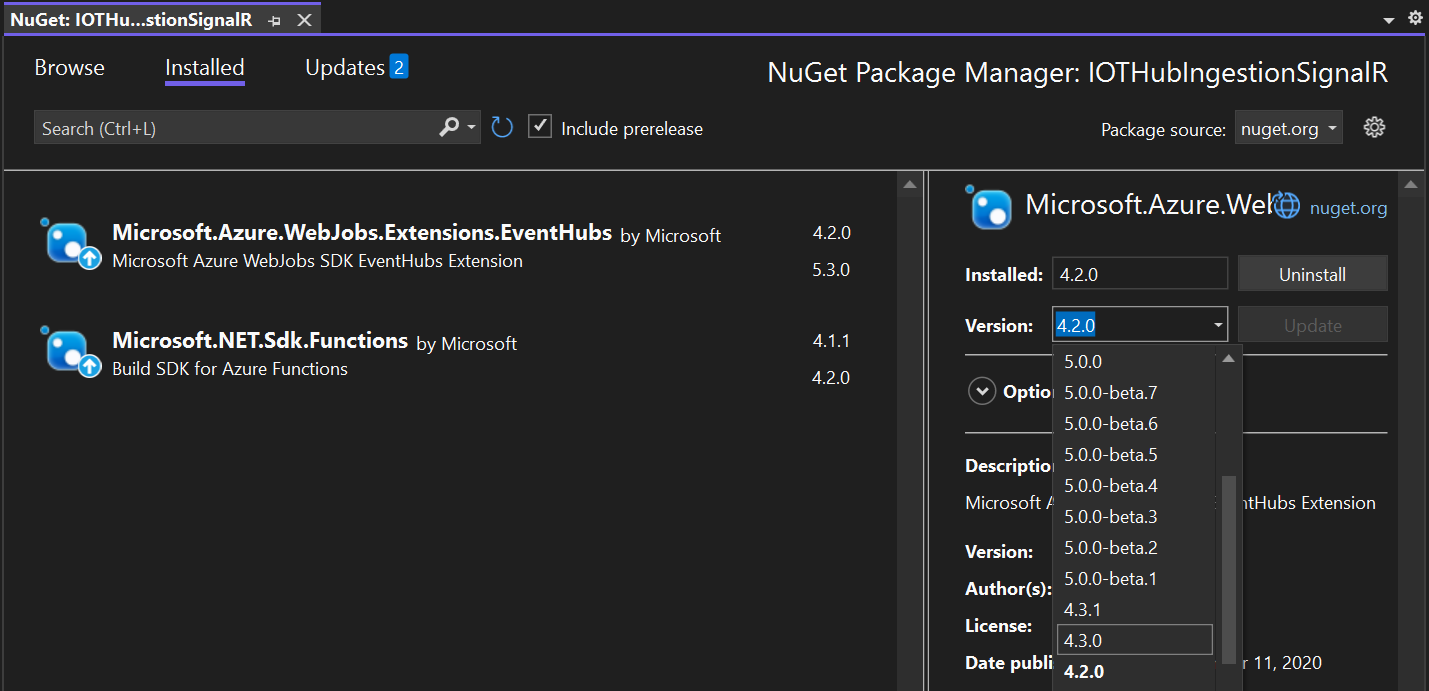
In the Preview Changes window, select OK.
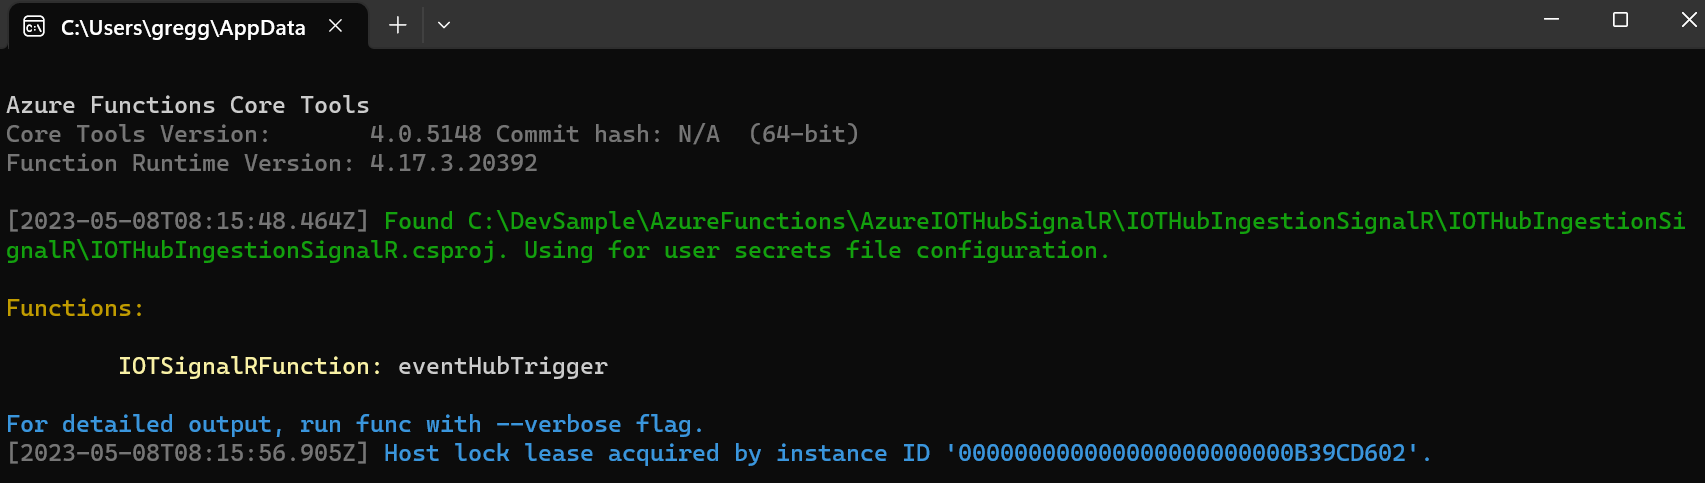
Run the Azure Function.
Create an Azure SignalR Service and Connect it to the Azure Functions Project
Navigate to the Azure Portal, and then search for signalr.
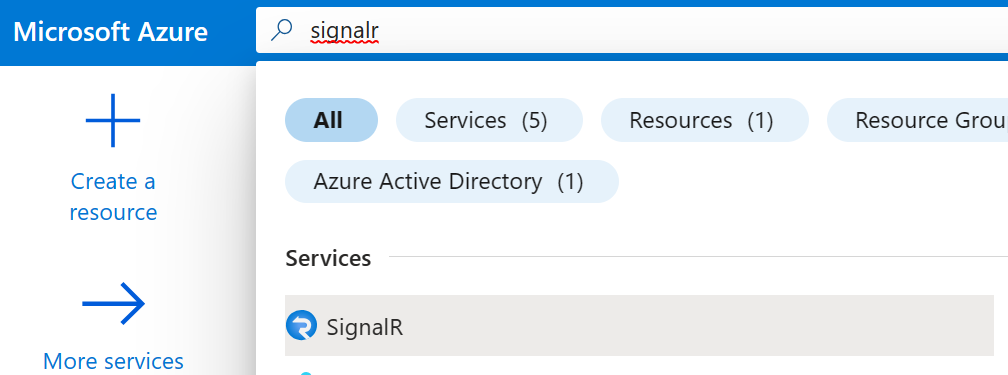
Select + Create.

Enter the following values in the Basics tab. Select Review + create, and then select Create.
Parameter Value Subscription Your Azure Subscription Resource group Create new with a name of your choice Resource name Chosen name for the SignalR service name Region Location nearest to you that has the SignalR service Pricing tier Free Service mode Serverless 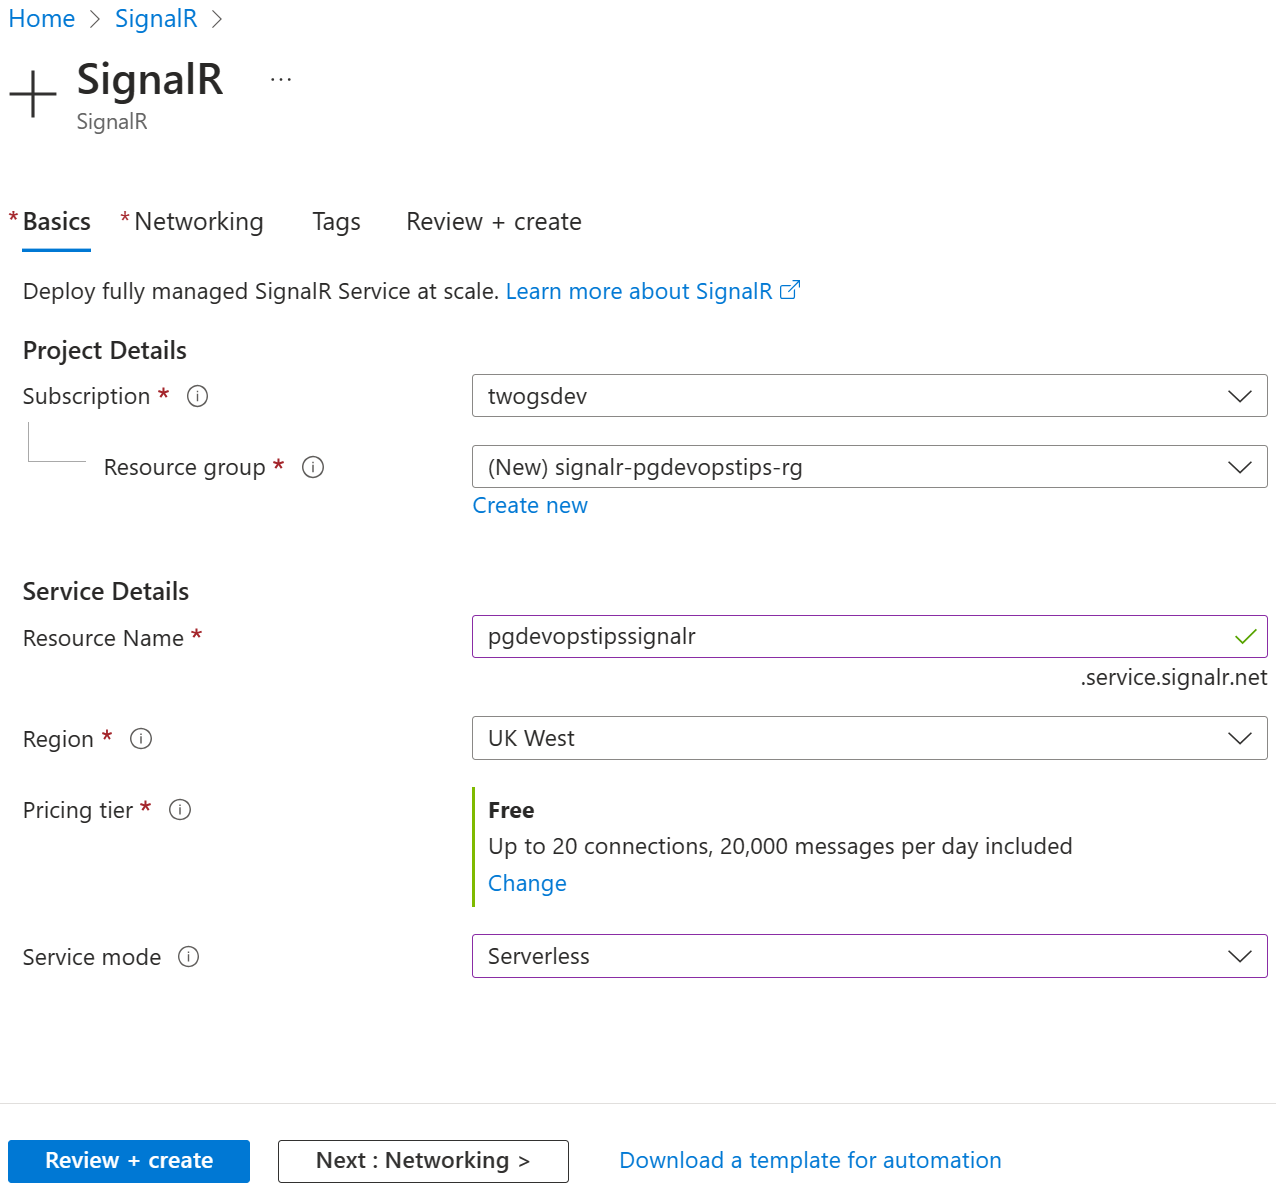
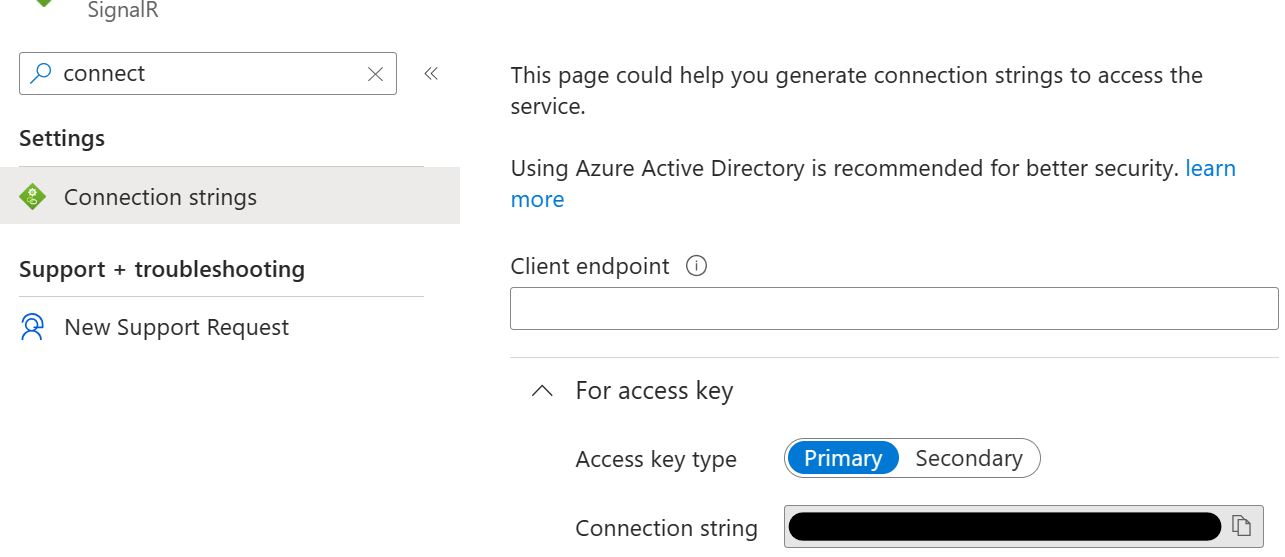
Navigate to the new SignalR service and then search for connect. Select Connection strings. Scroll down to the For access key section, and then copy the Connection string value.
Add SignalR Connection String to Azure Functions Project
In Visual Studio, open the
local.settingsfile, and then add the following code. Replace{YourConnectionString}with the connection string copied earlier.{ "IsEncrypted": false, "Values": { ... "AzureSignalRConnectionString": "{YourConnectionString}" } }Right click on the
Function1c# file. Select Rename, and then rename it toIOTSignalRFunction.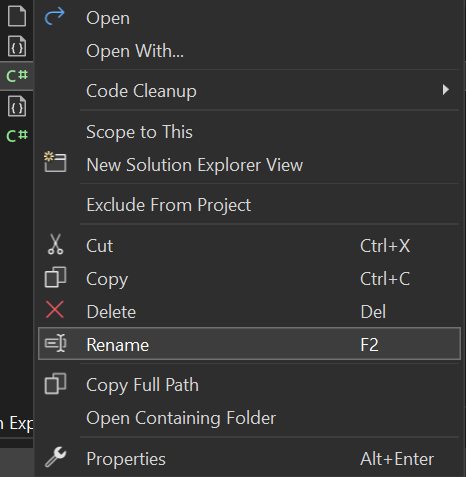
Replace the code in the
IOTSignalRFunctionwith the following.public static async Task RunAsync( [IoTHubTrigger("messages/events", Connection = "IoTHubEndpoint")]EventData message, [SignalR(HubName = "IOTSampleData")] IAsyncCollector<SignalRMessage> signalRMessages, ILogger log) { var iOTDeviceMessage = Encoding.UTF8.GetString(message.Body.Array); log.LogInformation($"C# IoT Hub trigger function processed a message: {iOTDeviceMessage}"); await signalRMessages.AddAsync( new SignalRMessage { Target = "iotDeviceMessage", Arguments = new[] { iOTDeviceMessage } }) .ConfigureAwait(false); }
Add SignalR Negotiate Function
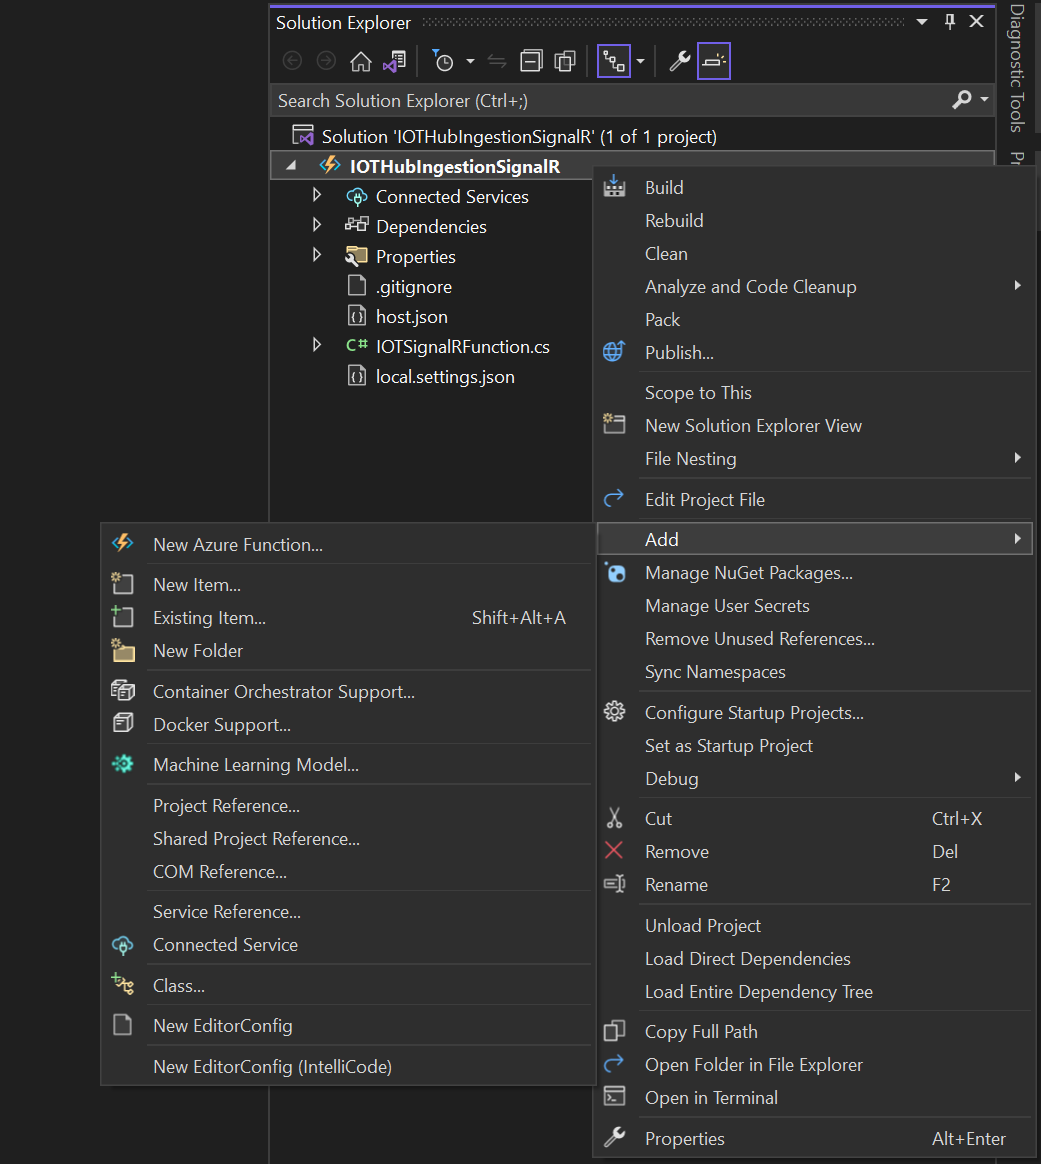
In Visual Studio, right click on the IOTHubIngestionSignalR Azure Functions project. Select Add, and then select New Azure Function.
Select Azure Function. Name the function SignalRNegotiate in the Name box, and then select Add.
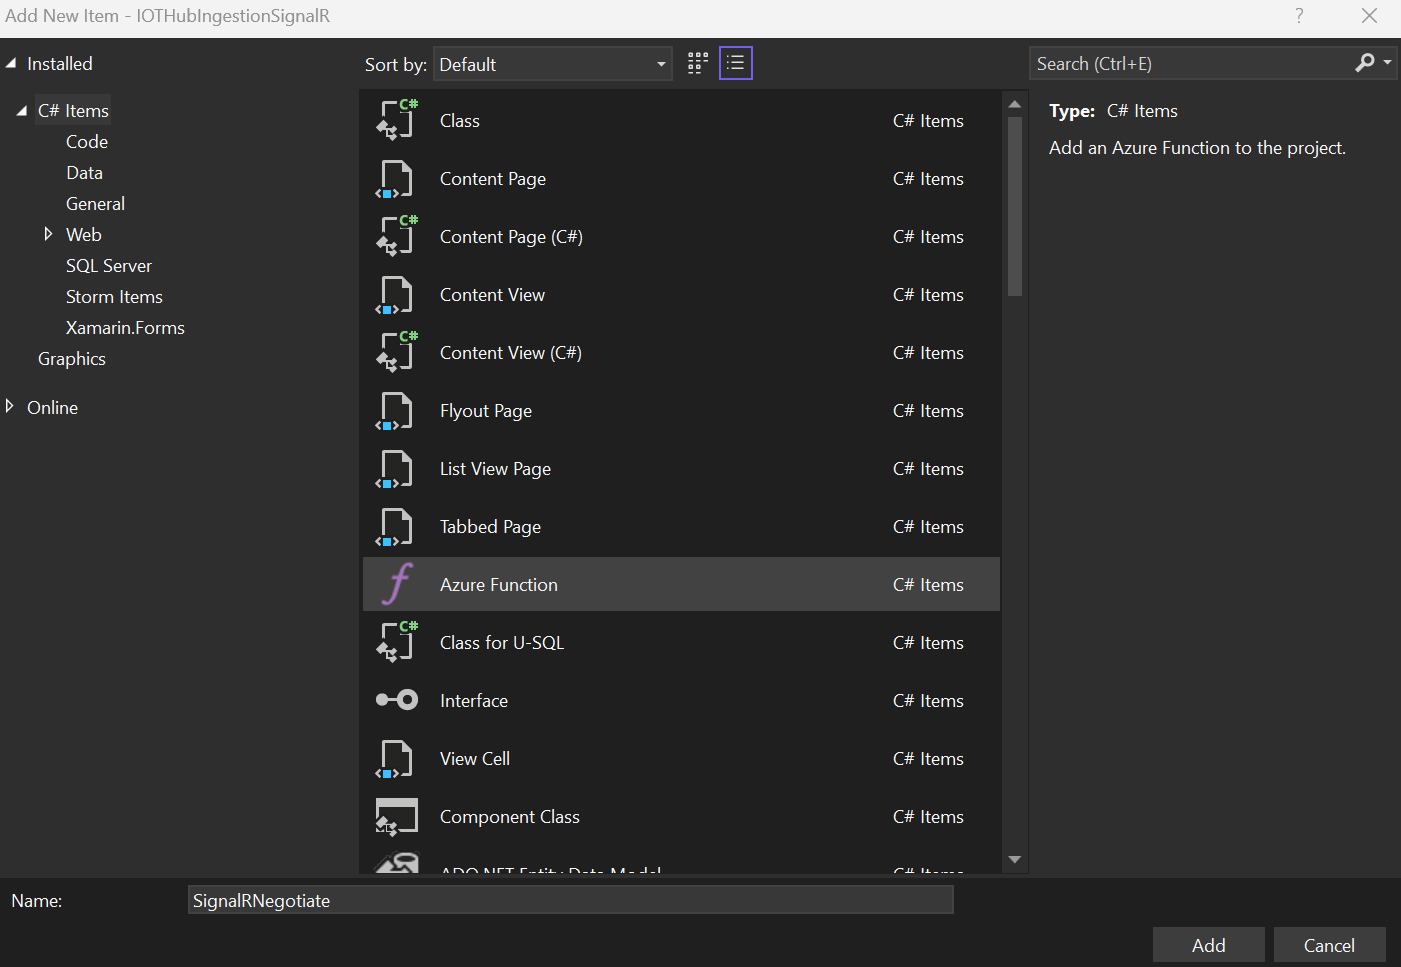
Select SignalR in the Azure Functions list. Enter the following values into the New Azure Function window, and then select Add.
Parameter Value Authorization level Anonymous Hub name IOTSampleData Configure SignalR connection Unchecked 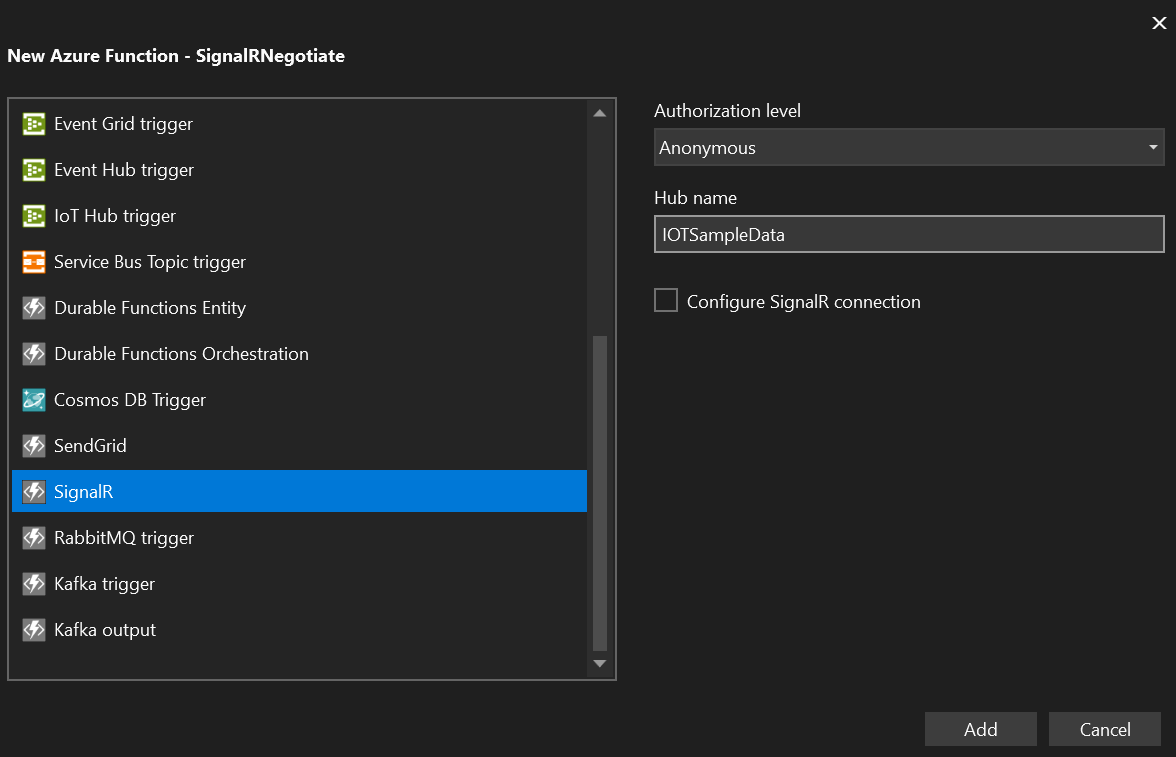
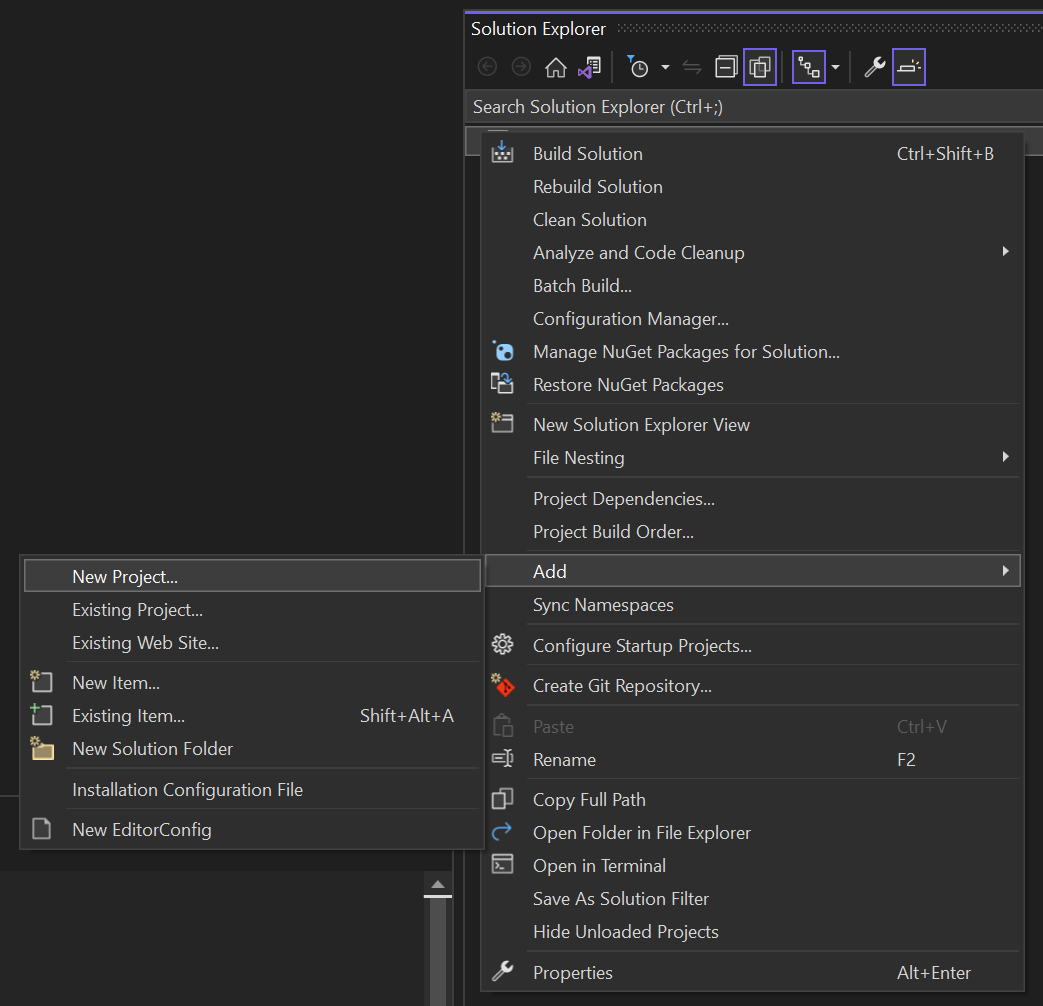
Add New Blazor WebAssembly App Project
In Visual Studio, right click on the IOTHubIngestionSignalR solution. Select Add, and then New Project.
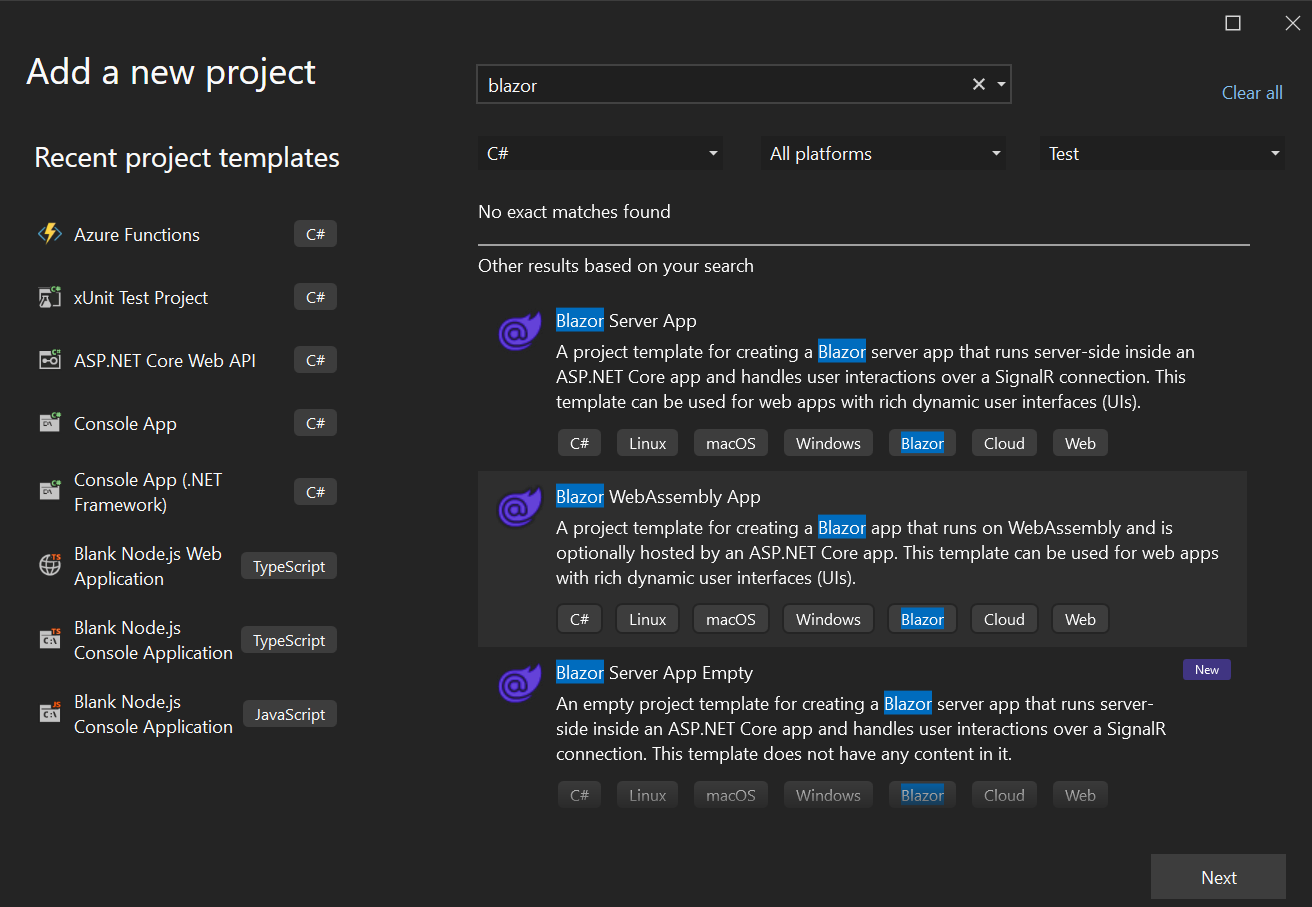
Search for blazor. Select Blazor WebAssembly App, and then Next.
Enter the following values in the Configure your new project window, and then select Next.
Parameter Value Project Name IOTDevices Location Location of your choice 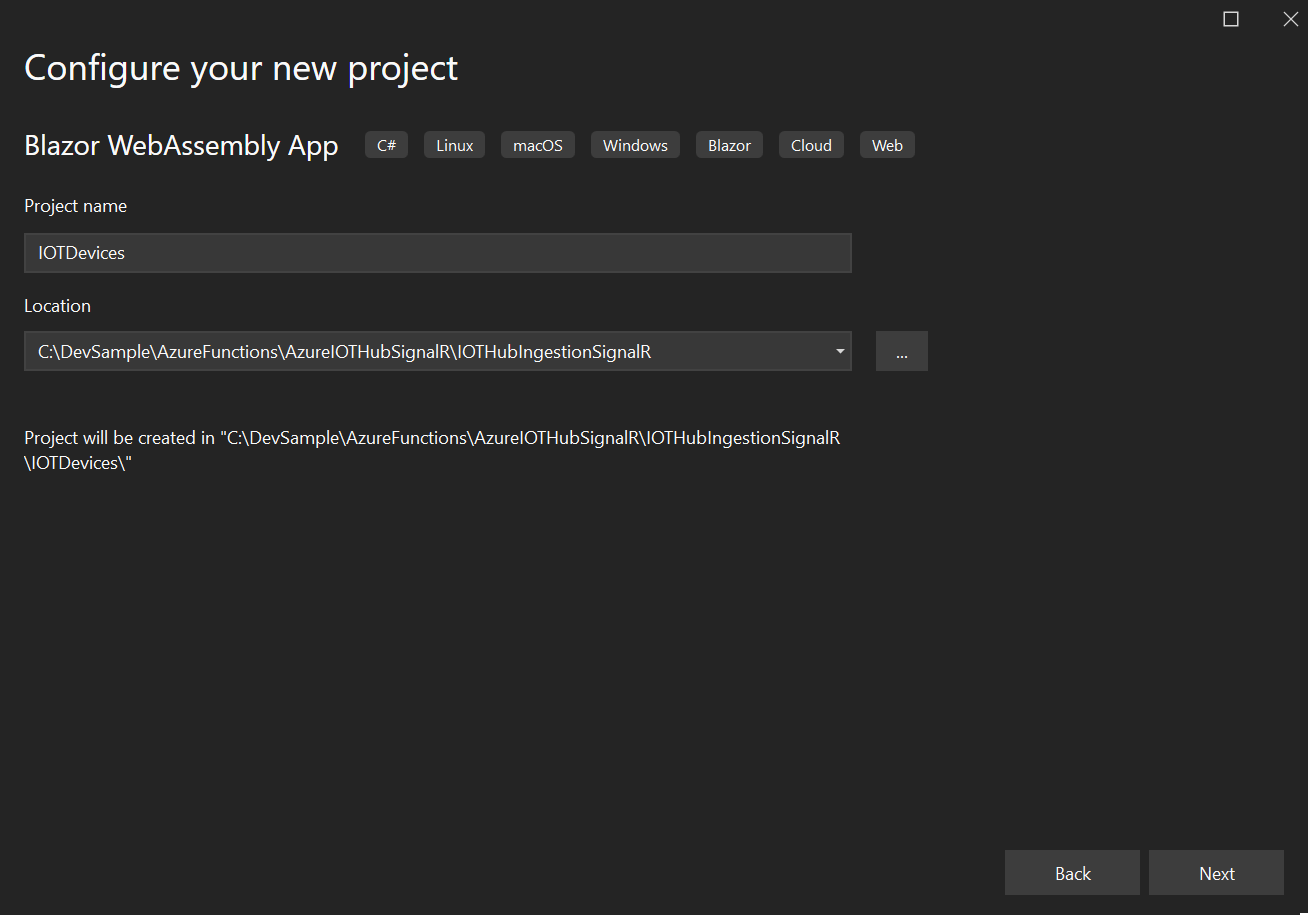
Enter the following values in Additional information, and then select Create.
Parameter Value Framework .NET 6.0 (Long-term support) Authentication type None Configure for HTTPS Checked ASP.NET Core Hosted Unchecked Progressive Web Application Unchecked Do not use top-level statements Unchecked 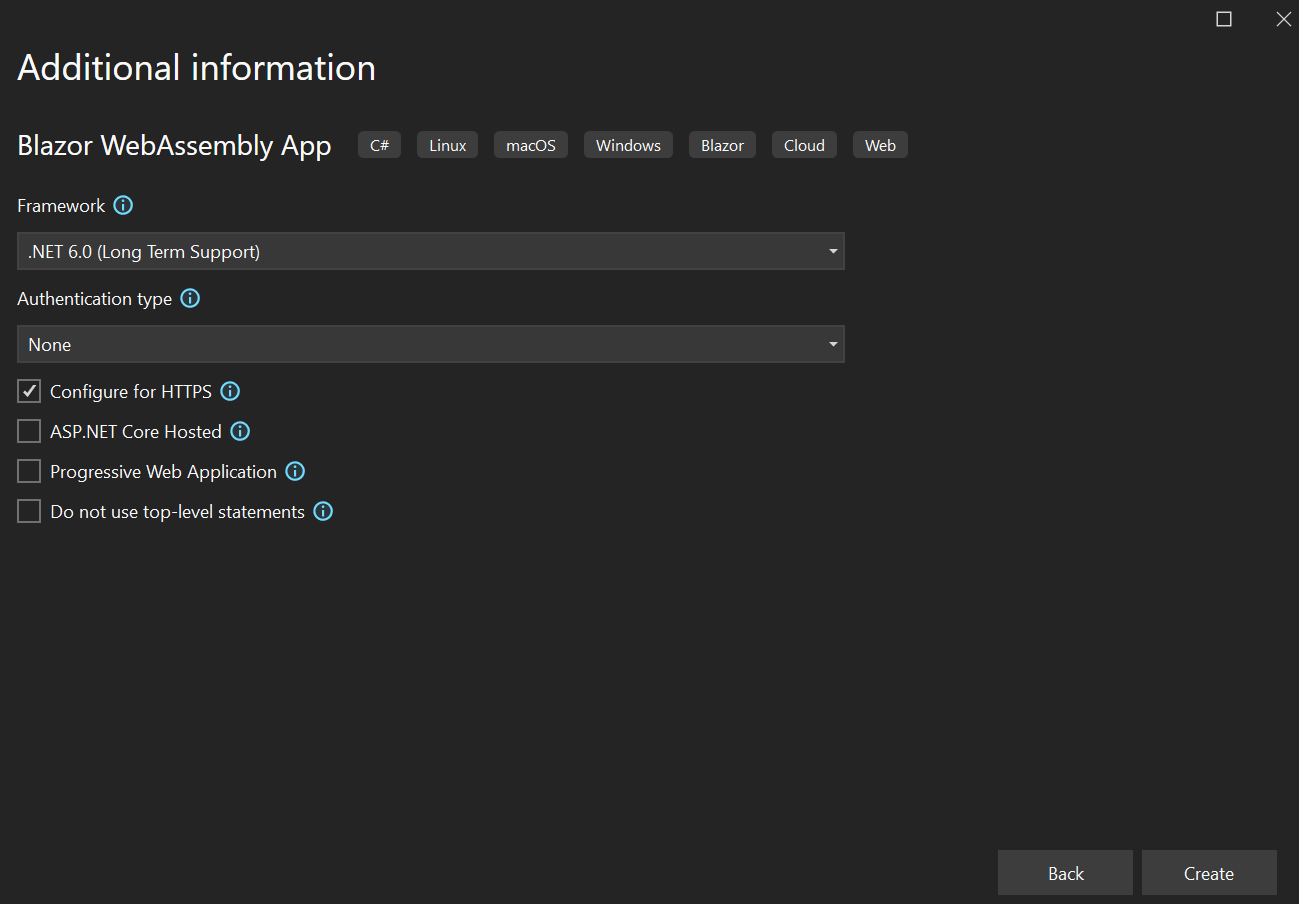
Install NuGet Packages
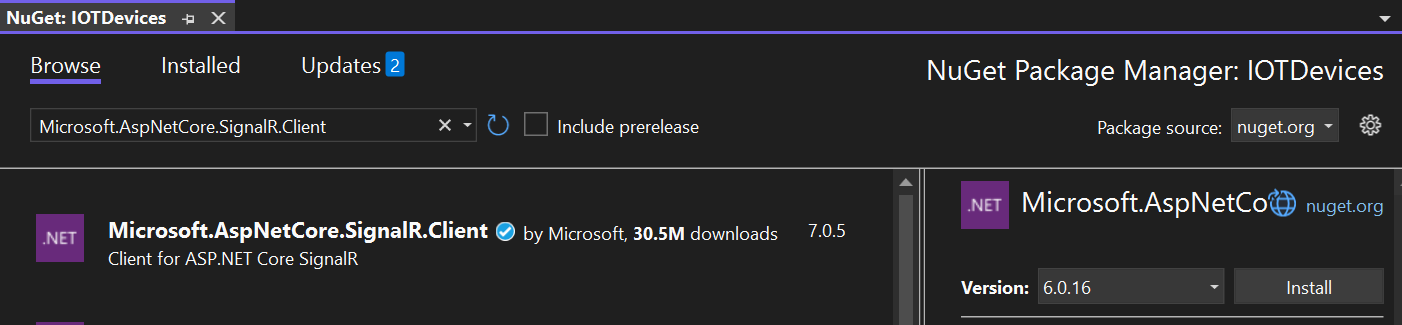
Right click on the IOTDevices project, and then select Manage NuGet Packages.
Select Browse and then search for Microsoft.AspNetCore.SignalR.Client, and then select Install.
In the Preview Changes window, select OK.
Still in the NuGet Package Manager, select Browse. Search for Microsoft.Extensions.Logging, and then select Install.

In the Preview Changes window, select OK.
Add Functionality to the Blazor WebAssembly App to Connect it to the Azure SignalR Service
In Visual Studio, open the
programc# file in the IOTDevices project, and add the following code aboveawait builder.Build().RunAsync();.... builder.Services.AddScoped(sp => new HttpClient { BaseAddress = new Uri(builder.HostEnvironment.BaseAddress) }); await builder.Build().RunAsync();Open the
launchSettingsjson file in the Properties folder of the IOTHubIngestionSignalR Azure function project, and copy the--portvalue incommandLineArgs.{ "profiles": { "IOTHubIngestionSignalR": { ... "commandLineArgs": "--port 7178 --cors https://localhost:7145", "launchBrowser": false } } }Right click on the Pages folder. Select Add, and then Razor Component....
Name the Razor Component FetchData in the Name box, and select Add.
Add the following code into
FetchData. Replace the{YourPort}in the url in following code with theportyou copied earlier.@page "/fetchdata" @using Microsoft.AspNetCore.SignalR.Client @implements IAsyncDisposable <PageTitle>IOT Devices</PageTitle> <h1>IOT Devices</h1> <ul id="messagesList"> @foreach (var message in messages) { <li>@message</li> } </ul> @code { private HubConnection? hubConnection; private List<string> messages = new List<string>(); protected override async Task OnInitializedAsync() { hubConnection = new HubConnectionBuilder() .WithUrl("http://localhost:{YourPort}/api") .Build(); hubConnection.On<string>("iotDeviceMessage", (message) => { var encodedMsg = $"{message}"; messages.Add(encodedMsg); StateHasChanged(); }); await hubConnection.StartAsync(); } public bool IsConnected => hubConnection?.State == HubConnectionState.Connected; public async ValueTask DisposeAsync() { if (hubConnection is not null) { await hubConnection.DisposeAsync(); } } }Open the
NavMenuRazor Component in the Shared folder and add the following code before the closing</nav>tag.<div class="nav-item px-3"> <NavLink class="nav-link" href="fetchdata"> <span class="oi oi-list-rich" aria-hidden="true"></span> Fetch data </NavLink> </div>
Enable CORS in the Azure Functions Project
In Visual Studio, open the
launchSettingsjson file in the Properties folder of the IOTDevices project. Copy thehttpsurl inapplicationUrlunderIOTDevices.{ "profiles": { "IOTDevices": { ... "applicationUrl": "https://localhost:7145;http://localhost:5205" }, ... } }Open the
launchSettingsjson file in the Properties folder of the IOTHubIngestionSignalR Azure function project. Add--cors https://localhost:7145to the end ofcommandLineArgs. Replace thelocalhost:7145with theapplicationUrlyou copied earlier.{ "profiles": { "IOTHubIngestionSignalR": { "commandName": "Project", "commandLineArgs": "--port 7178 --cors https://localhost:7145", "launchBrowser": false } } }Open the
local.settingsjson file in the IOTHubIngestionSignalR Azure function project, and add the following code to the end of the file."Host": { "LocalHttpPort": 7178, "CORS": "https://localhost:7145", "CORSCredentials": false }
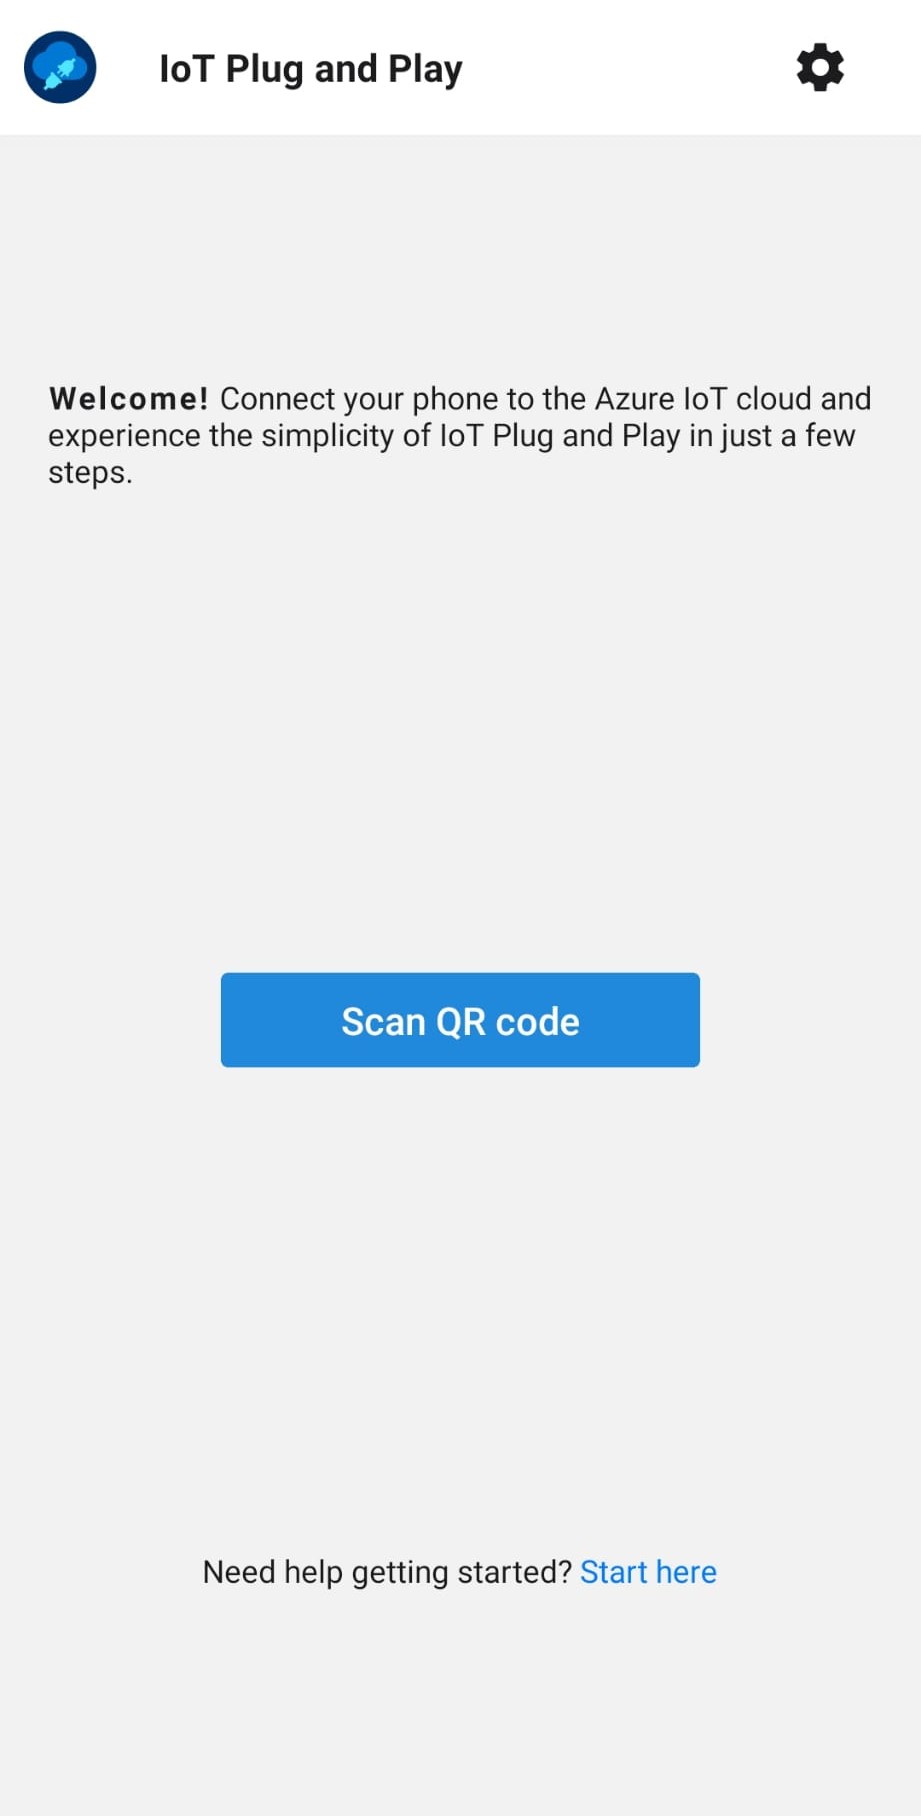
Install the Azure Plug and Play Mobile App
- Install the Azure Plug and Play mobile app onto your device.
Setup Your Device in Azure IoT Hub
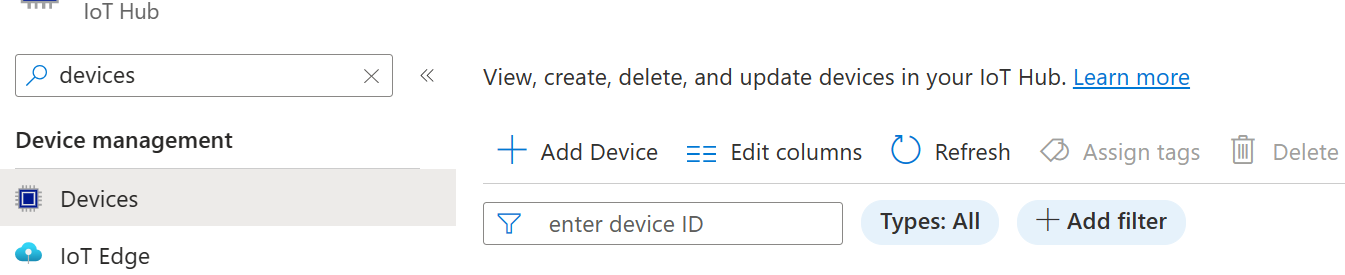
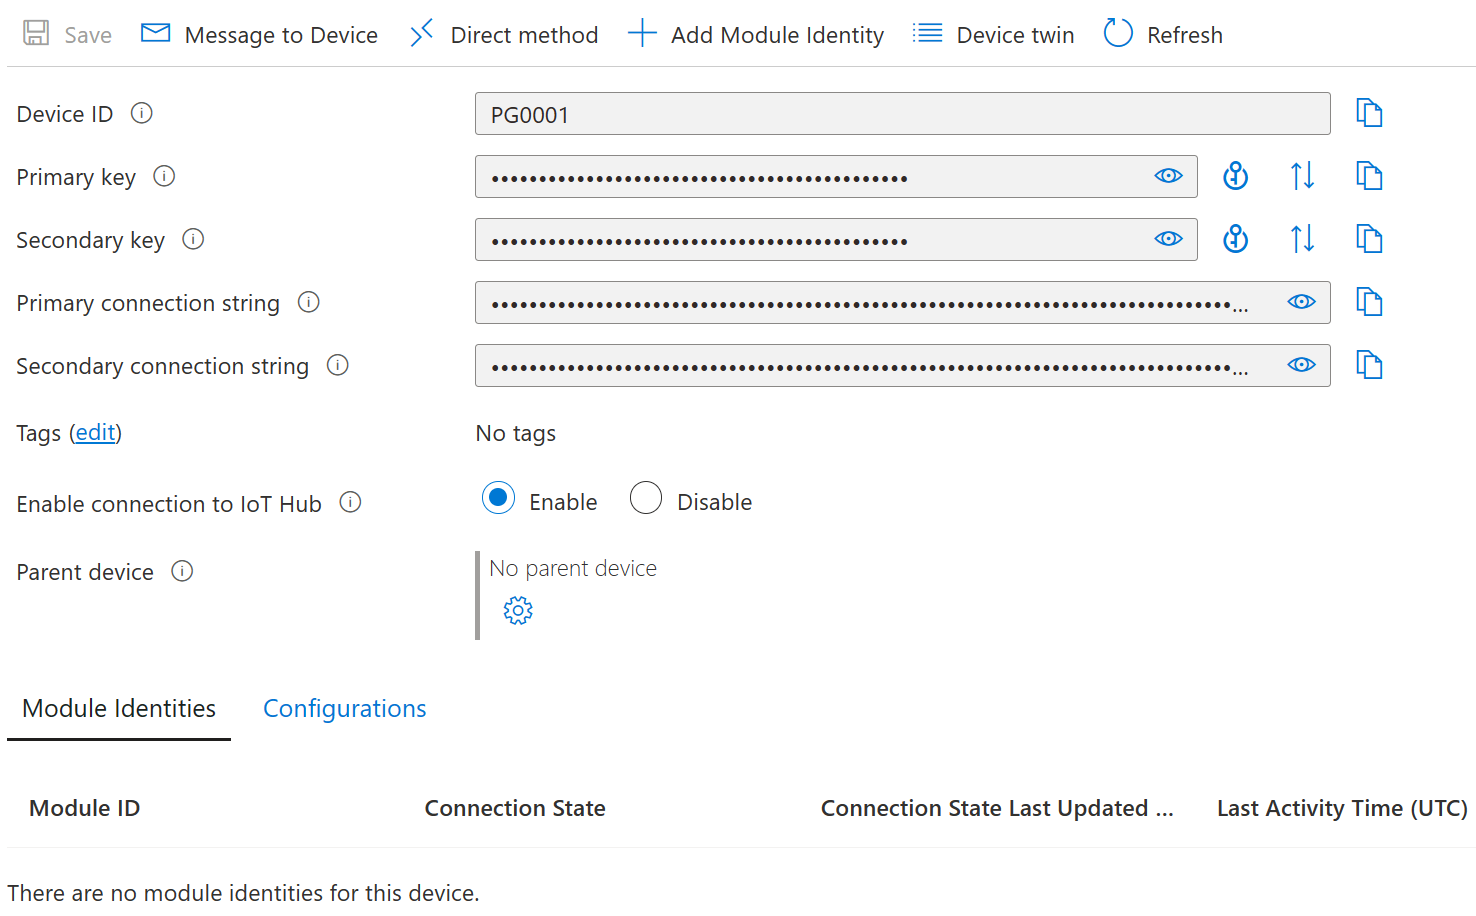
Navigate to the IoT Hub in the Azure Portal. Search for devices, and then select + Add Device.
Enter the following values in the Create a device window.
Parameter Value Device ID A device ID of your choice IoT Edge Device Unchecked Authentication type Symmetric key Auto-generate keys Checked Connect this device to an IoT hub Enable Parent device No parent device 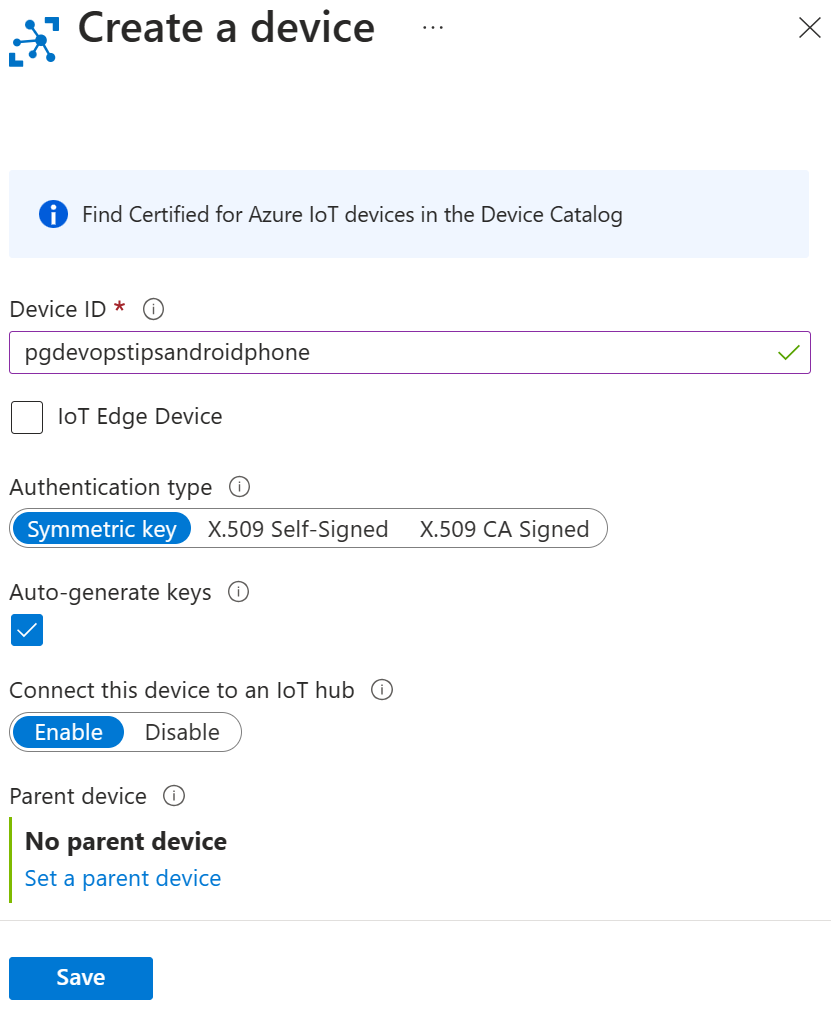
Select the new device when its created in the Devices tab, and then copy the Primary connection string.
Open the Azure Plug and Play mobile app on your device. Select Scan QR code .
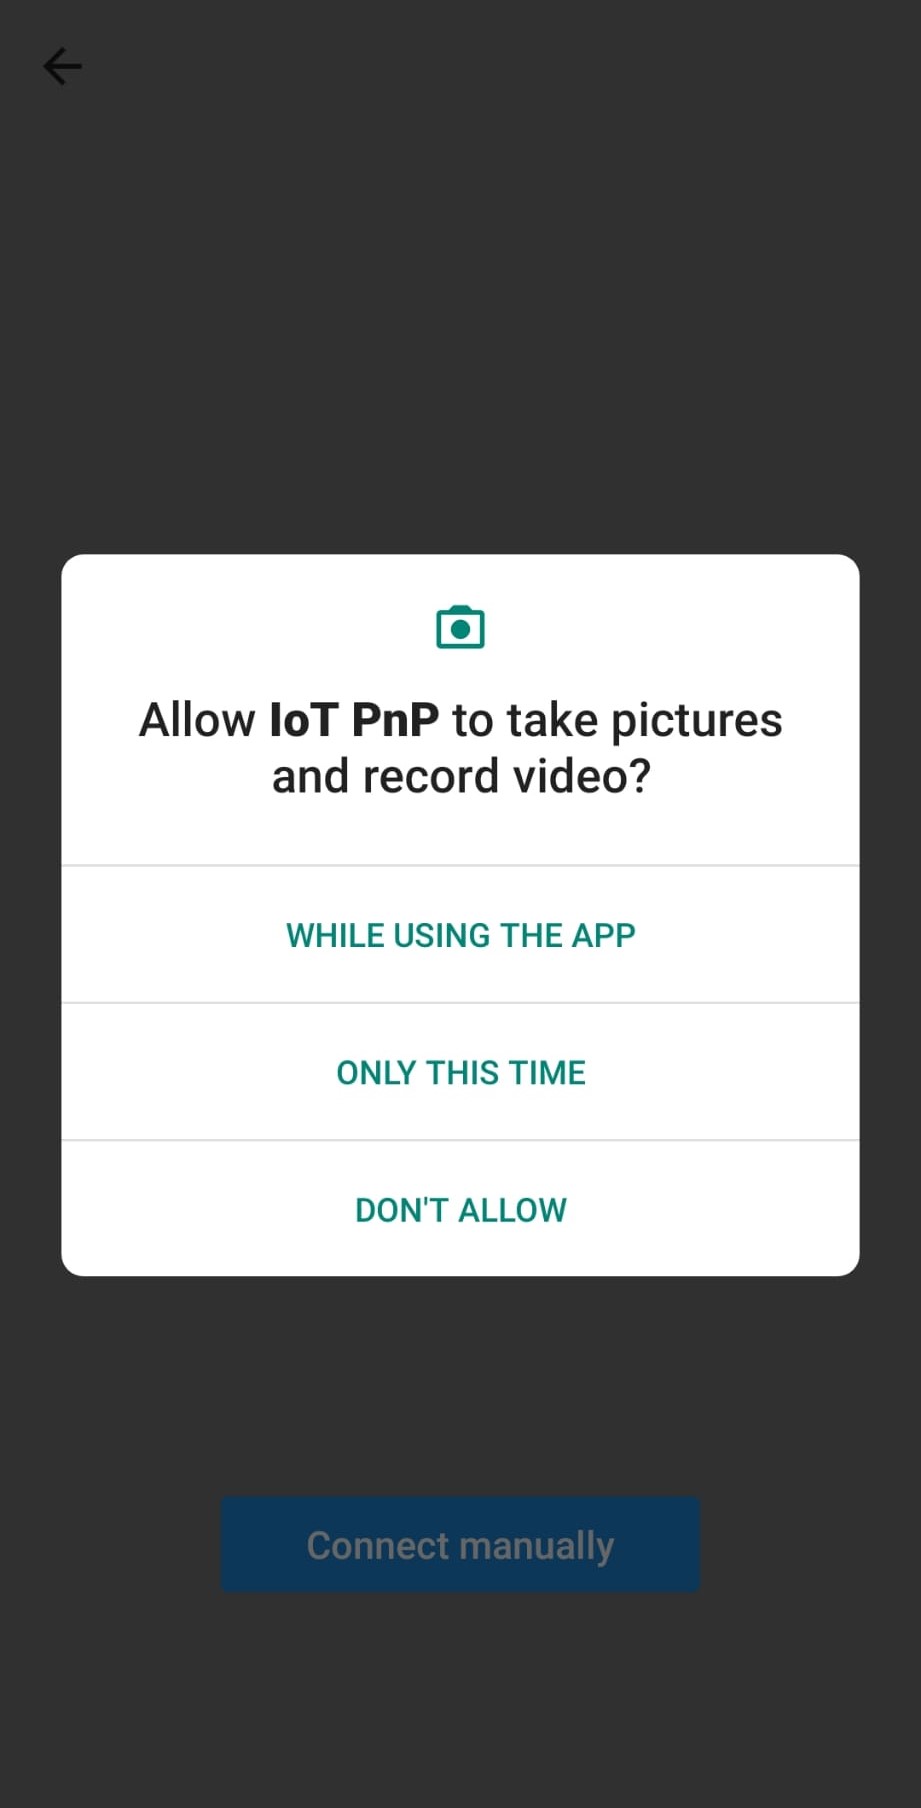
Select the option to Allow IoT PnP to take pictures and record video with your devices camera.
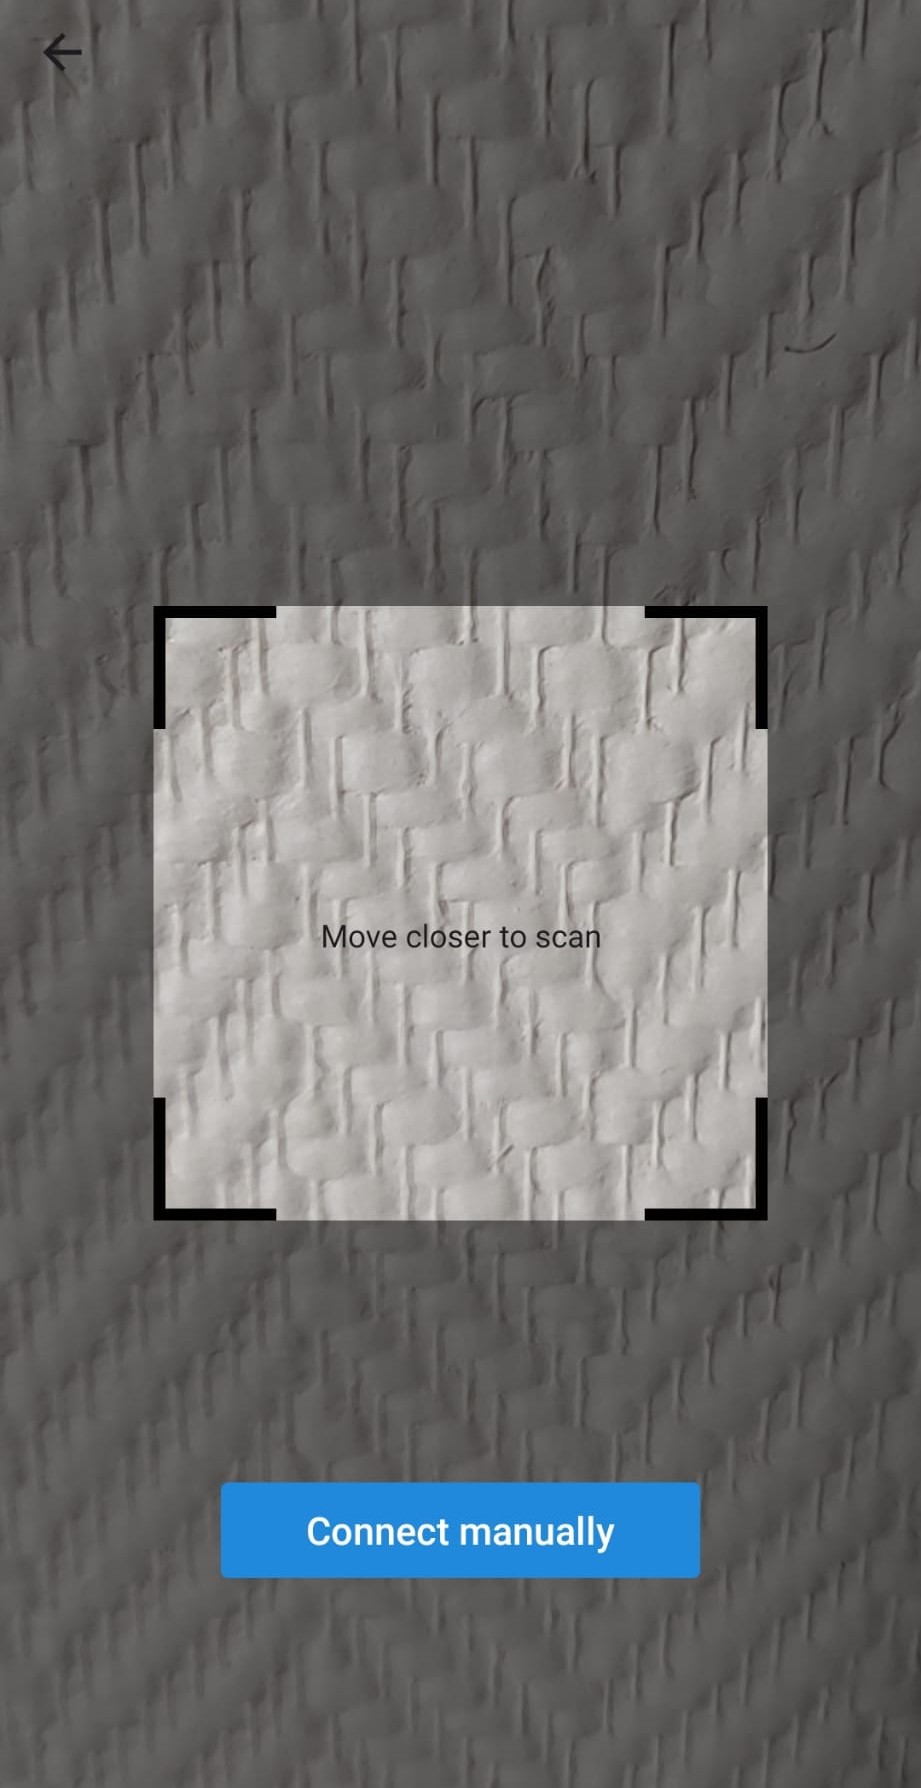
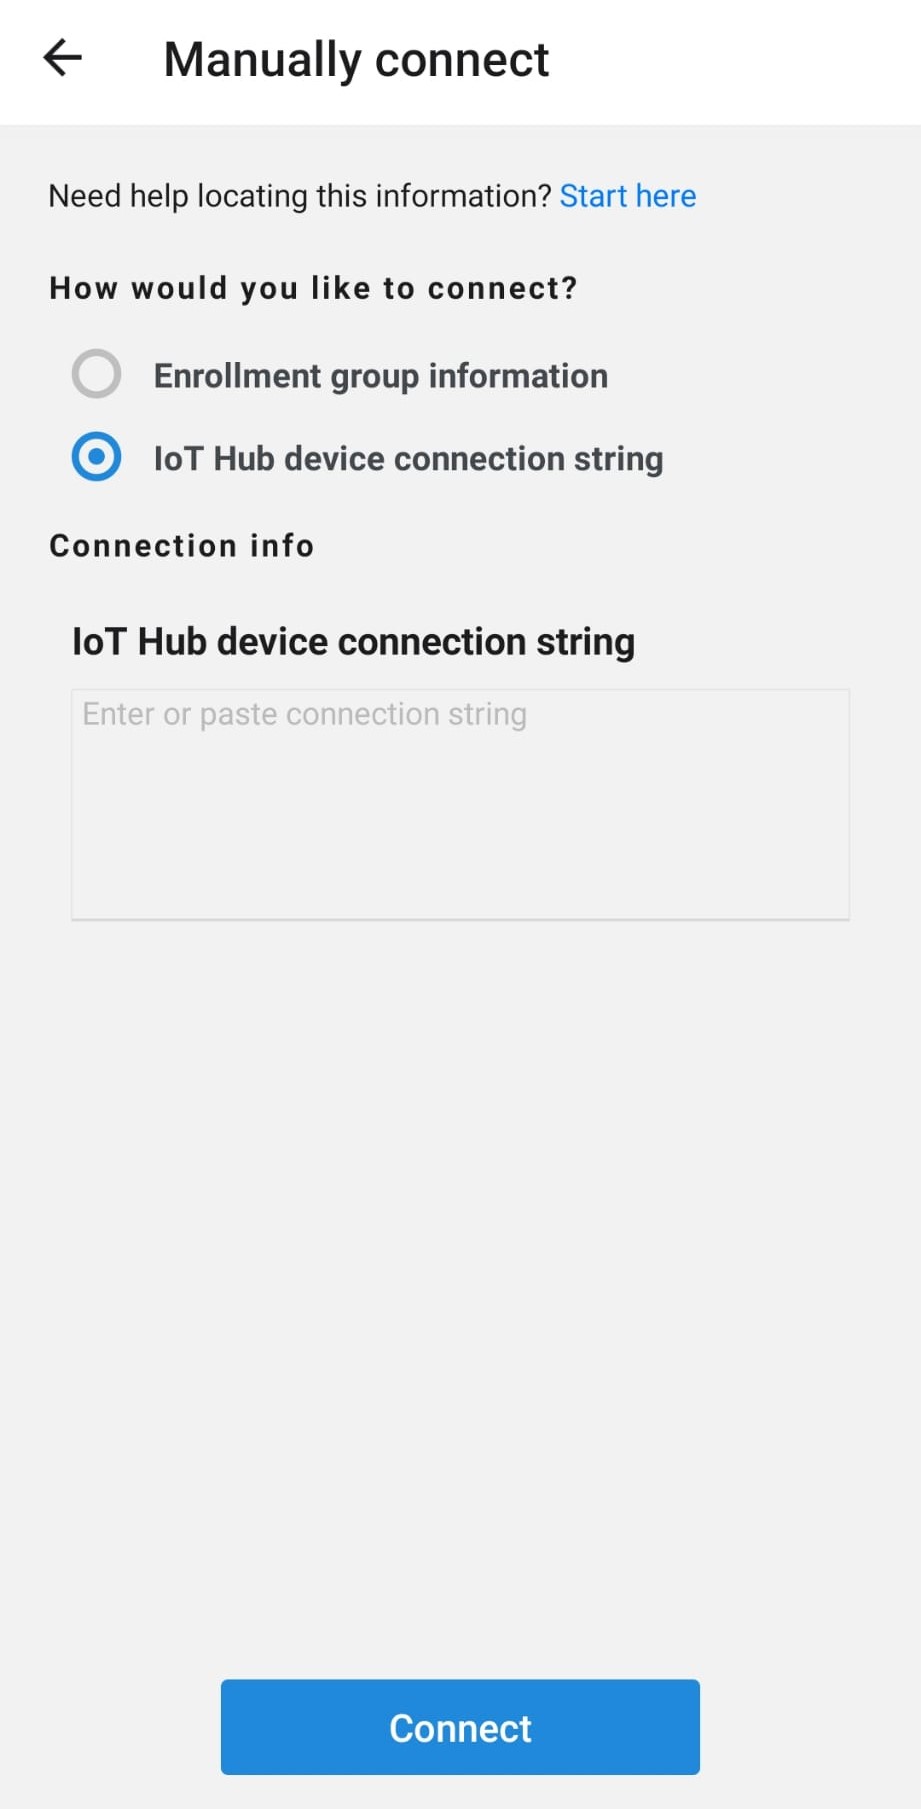
Select Connect Manually.
Select IoT Hub device connection string. Enter the connection string you copied earlier, and then select Connect.
Send Data from the Azure IoT Plug and Play Mobile Application to the Blazor WebAssembly App
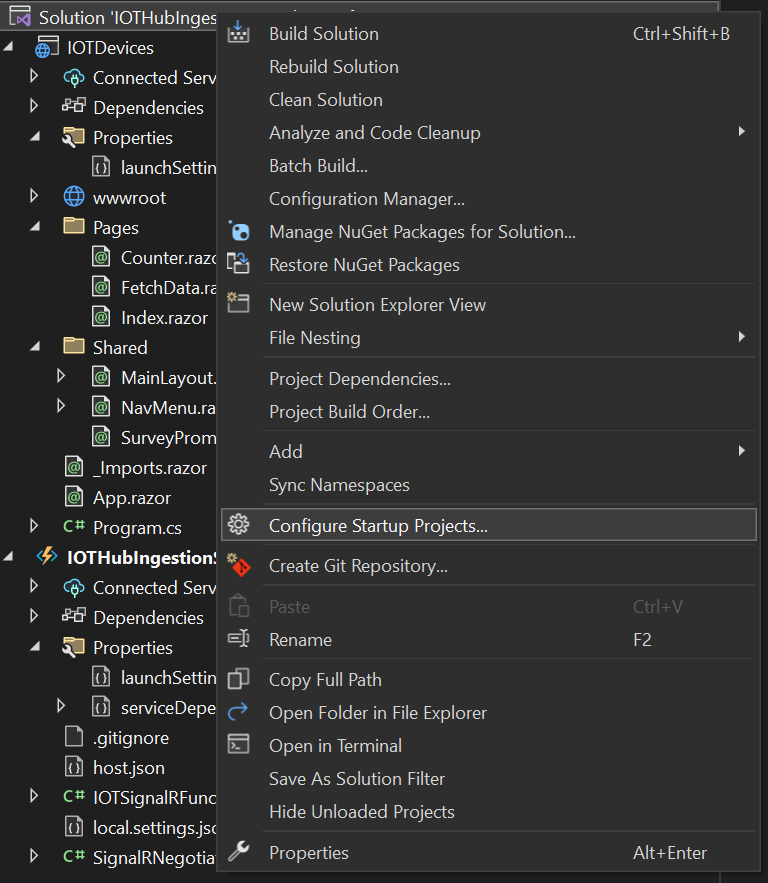
In Visual Studio, right click on the IOTHubIngestionSignalR, solution and then select Configure Startup Projects....
Select Multiple startup projects, and then OK.
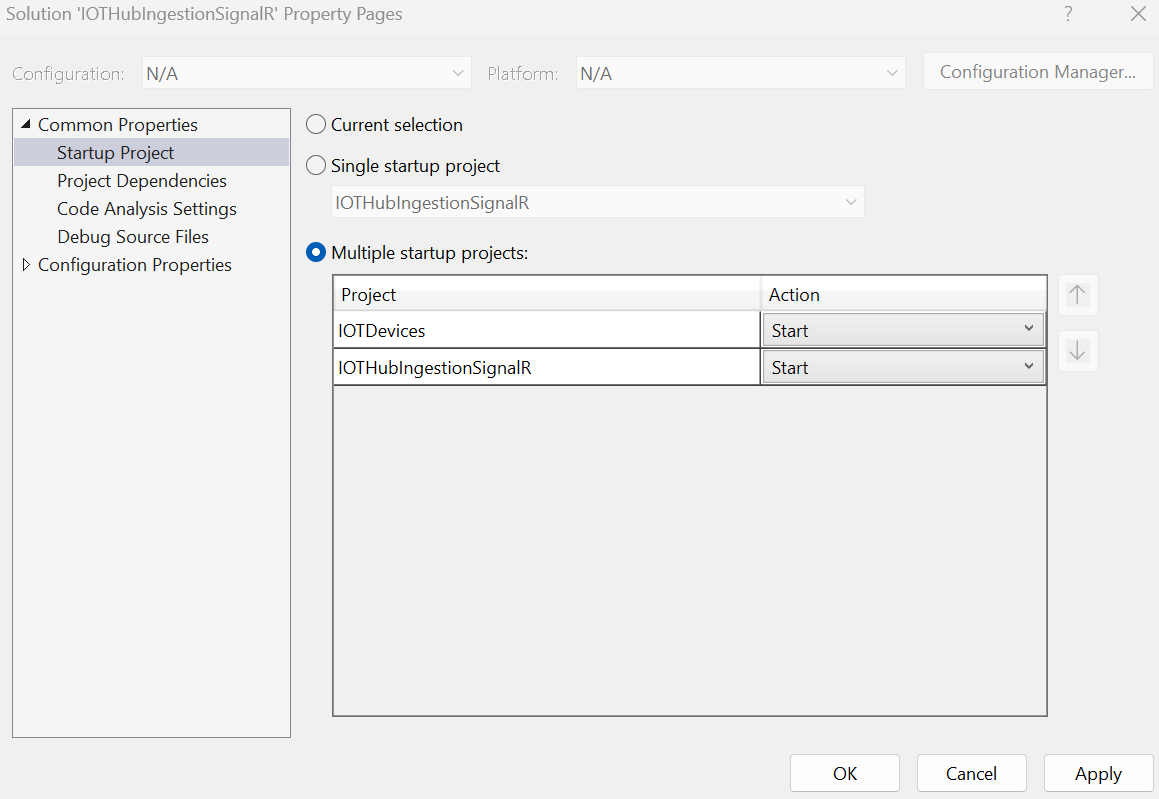
Select Start.

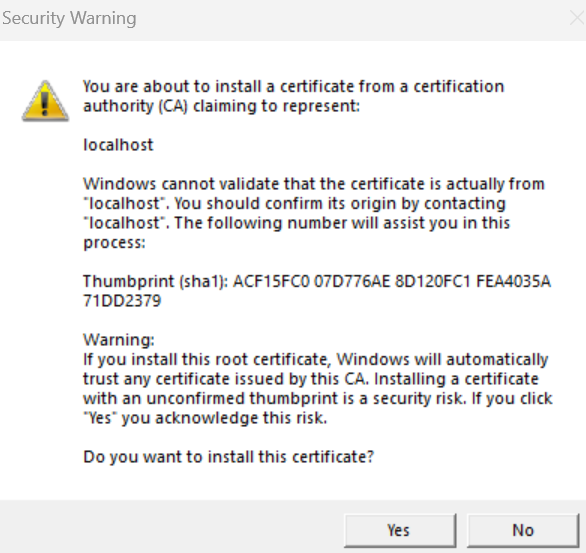
Select Yes.
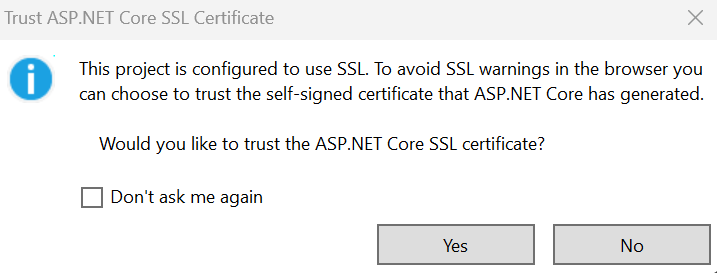
Select Yes.
Open the Azure Plug and Play Mobile App on your device.
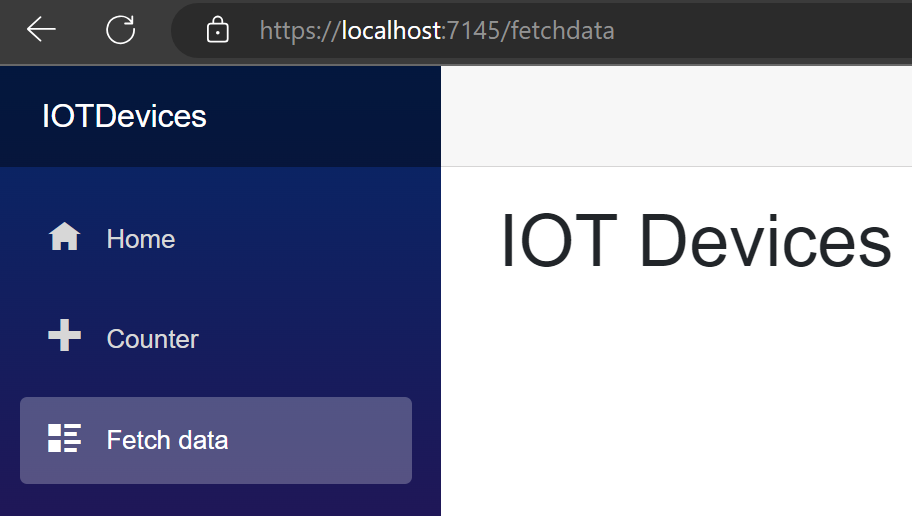
Navigate to the FetchData page in the Blazor WebAssembly App.
Got a comment?
All my articles are written and managed as Markdown files on GitHub.
Please add an issue or submit a pull request if something is not right on this article or you have a comment.
If you'd like to simply say "thanks", then please send me a so the rest of Twitter can see how awesome my work is.